คู่มือใช้งาน Manual
ก่อนลงมือประกอบเครื่องคอมพิวเตอร์ ควรศึกษาคู่มือการใช้งาน (User’s Manual / User Guide) เป็นอันดับแรก เช่น คู่มือเมนบอร์ด และคู่มือซีพียู ซึ่งคู่มือเหล่านี้ ปกติจะติดมาพร้อมกับบรรจุภัณฑ์ของอุปกรณ์เหล่านั้น
Prior to assembling computers Study Manual (User's Manual / User Guide), the first such motherboard manual. CPU manual This guide these Usually stick with the packaging of those devices.
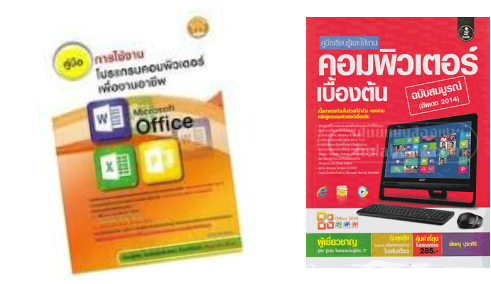
รูปที่ 3.1 ตัวอย่างคู่มือในการใช้งานคอมพิวเตอร์
Figure 3.1 Example of computer applications.
สำหรับนักคอมพิวเตอร์มือใหม่ มักมองข้ามประโยชน์จากคู่มือเหล่านี้ ซึ่งอาจติดตั้งด้วยวิธีลองผิดลองถูก ซึ่งแม้ว่าวิธีนี้อาจนำมาใช้งานได้บางครั้ง แต่ส่งผลเสียมากกว่าผลดี ดังนั้นทางที่ดีควรศึกษารายละเอียดในคู่มือก่อน เพื่อป้องกันการเกิดข้อผิดพลาดจากการติดตั้งแบบผิดวิธี ที่อาจส่งผลต่อความเสียหายของอุปกรณ์เหล่านั้นได้
For novice computer Often overlooked advantage of these manuals. This can be installed by trial and error. Although this method may be used occasionally. But the result was more than good. So the best way is to refer to the manual first. To prevent errors from installing the wrong way. Which could lead to damage of those devices.
ทั้งคู่มือเมนบอร์ด คู่มือซีพียู รวมถึงคู่มืออุปกรณ์อื่นๆ ที่เกี่ยวข้อง ล้วนมีประโยชน์ต่อการประกอบเครื่อง ซึ่งจะอธิบายรายละเอียดการตั้งค่าต่างๆ การแสดงภาพสาธิตวิธีการติดตั้งอุปกรณ์อย่างถูกวิธี รวมถึงคำแนะนำเกี่ยวกับข้อห้ามและข้อควรปฏิบัติต่างๆ เป็นต้น
The user manual for the motherboard, CPU and other equipment manuals. Related There are benefits to the machine. Which describes the various settings. The demonstration how to install it properly. Including recommendations regarding contraindications and precautions are introduced.
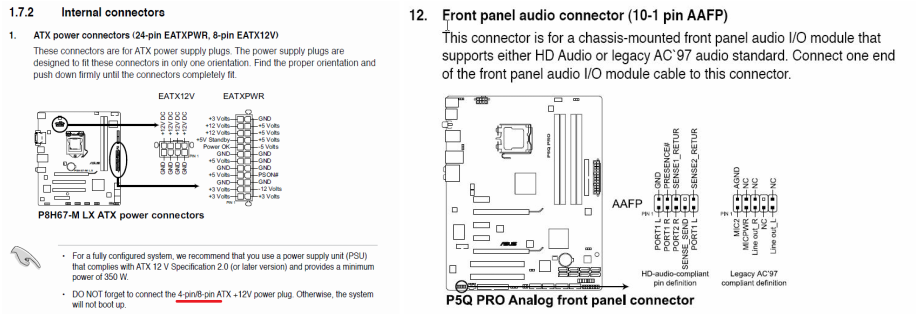
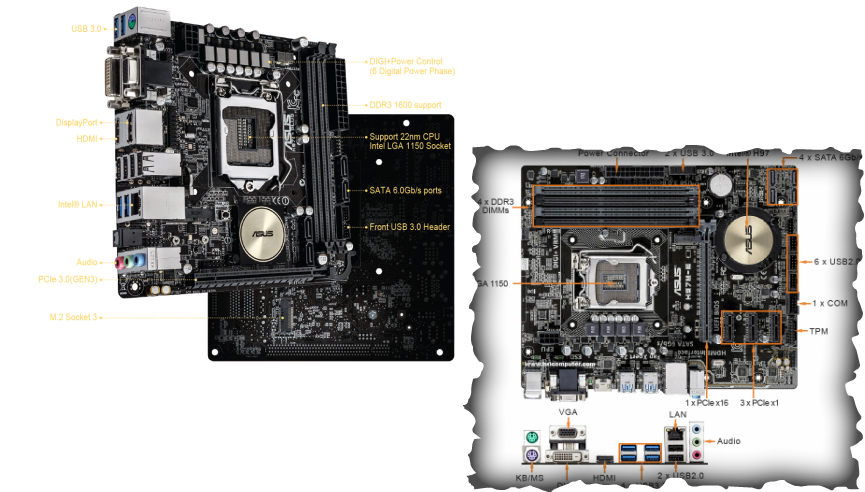
รูปที่ 3.2 ตัวอย่างรายละเอียดภายในคู่มือเมนบอร์ด
Figure 3.2 An example detailed in the motherboard manual.
ในขณะเดียวกัน คู่มือซีพียู ก็จะแนะนำการติดตั้งซีพียูและชุดพัดลมที่ถูกต้อง และต่อไปนี้เป็นภาพสาธิตการติดตั้งซีพียูและชุดพัดลม ที่พิมพ์อยู่ในเครื่องมือดังกล่าว
the same CPU Manual, it is recommended to install the CPU fan and accurate. And following a demo installation and a series CPU fan. Printed in such instruments.
- โยกคันล็อกซีพียูออก
- เปิดฝาครอบออกมา
- ห้ามใช้นิ้วสัมผัสกับซ็อกเก็ตซีพียูโดยตรง
- นำฝาครอบกันกระแทกที่ครอบบนซ็อกเก็ตซีพียูออกไป
- นำซีพียูออกจากกล่องบรรจุด้วยความระมัดระวัง
- ห้ามใช้นิ้วกดลงบนเข็ม หรือสัมผัสโดยตรงกับผิวสัมผัสบนตัวซีพียู
- วางซีพียูลงในซ็อกเก็ตเบาๆ โดยให้สังเกตตำแหน่งมุมตัดหรือรอยบากให้ตรงกัน
- ปิดฝาครอบและกดคันล็อกลงมาเพื่อล็อกซีพียูเข้ากับเมนบอร์ด
- นำชุดครีบระบายความร้อนพร้อมพัดลงวางลงบนตัวซีพียู ใช้วางตรงตำแหน่งรูยึดขาทั้ง 4 มุม (สำหรับสารตัวนำความร้อน ซึ่งจำเป็นต้องใช้ร่วมกันกับการติดตั้งชุดพัดลมเข้ากับซีพียูนั้น สามารถศึกษาเพิ่มเติมได้จากหัวข้อขั้นตอนการประกอบเครื่อง)
- กดขายึดทั้ง 4 ขาให้เกิดเสียงดังคลิก
- เสียบปลั๊กไฟให้กับพัดลม
1. CPU lever lock out
2. Open the cover off
3. Do not touch the CPU socket directly.
4. The cushioned cover cap on the CPU socket.
5. Remove the CPU from its packaging with care.
6. Do not use your fingers to press down on the needle. Or direct contact with the CPU surface.
7. Place the CPU into the socket gently. To observe the corner cutting or incision synchronization.
8. Close the cover and lock lever down to lock the CPU into the motherboard.
9. Set the cooling fins and blowing down onto the CPU. Take place at the four corners of the leg holes (for heating substances. Which need to be shared with the installation of the fan to the CPU. You can learn more on the topic, the process of assembling).
10. Press the mounting bracket, the fourth leg of the loud click.
11. Plug the fan
ขั้นตอนการประกอบเครื่องคอมพิวเตอร์ PC assembly process.
ในการประกอบเครื่องคอมพิวเตอร์ (พีซีคอมพิวเตอร์) นอกจากต้องเตรียมอุปกรณ์ฮาร์ดแวร์ต่างๆ ที่เกี่ยวข้องแล้ว ยังต้องเตรียมชุดเครื่องมือ ซึ่งอย่างน้อยก็ควรมี ไขควง คีม หรืออาจหาชุดเครื่องมือครบชุดไว้ใช้งาน
In assembling computer (PCs) are required to provide hardware devices. Related ago Also be prepared Kits Which at least should have a screwdriver, pliers or a full set of tools to use.
In assembling computer (PCs) are required to provide hardware devices. Related ago Also be prepared Kits Which at least should have a screwdriver, pliers or a full set of tools to use.

รูปที่ 3.3 ชุดเครื่องมือที่นำมาใช้สำหรับการประกอบเครื่องพีซี
Figure 3.3 toolset used for assembling a PC.
สำหรับขั้นตอนการประกอบเครื่องคอมพิวเตอร์ ในที่นี้ได้แบ่งออกเป็น 11 ขั้นตอนด้วยกัน คือ
For the process of assembling a PC. In this divided into 11 stages together.
- เตรียมตัวถังเครื่องคอมพิวเตอร์ Prepare the computer chassis
- ติดตั้งซีพียู CPU installed
- ติดตั้งแผงหน่วยความจำ Install memory
- ติดตั้งเมนบอร์ดลงในเคส Install the motherboard into the case
- เชื่อมต่อเมนบอร์ดด้วยปลั๊กและสวิตซ์ไฟต่างๆ Motherboard connections with various plugs and switches.
- ติดตั้งฮาร์ดดิสก์ Installation
- ติดตั้งเครื่องขับดีวีดี Installation DVD drive
- ติดตั้งเครื่องอ่านการ์ดหน่วยความจำ (ถ้ามี) Install a memory card reader (if available).
- ติดตั้งอะแดปเตอร์การ์ด (ถ้ามี) Installing an adapter card (if available).
- ปิดฝาเคส Case closed
- ทดสอบการใช้งาน Usability Testing
ขั้นตอนที่ 1 : เตรียมตัวถังเครื่องคอมพิวเตอร์
Step 1: Prepare the computer chassis.
ตัวถังเครื่องคอมพิวเตอร์ หรือที่มักเรียกกันสั้นๆว่า “เคส (Case)” นั้น จะมีลักษณะคล้ายกับกล่องที่ใช้ห่อหุ้มอุปกรณ์ภายใน อันประกอบด้วย เพาเวอร์ซัพพลาย แผงวงจรอิเล็กทรอนิกส์ สายไฟ สายสัญญาณ และอุปกรณ์อื่นๆ (เช่น ฮาร์ดดิสก์ และเครื่องขับดีวีดี) ในปัจจุบันมีเคสอยู่หลายรูปแบบ หลายขนาด ให้เลือกใช้งาน มีทั้งเคสที่บรรจุเพาเวอร์ซัพพลายมาให้พร้อม กับเคสเปล่าๆ (ต้องหาซื้อเพาเวอร์ซัพพลายมาติดตั้งเพิ่มเติมเอาเอง) ที่สำคัญควรเลือกใช้เคสคอมพิวเตอร์ให้ตรงกับ Form Factor ของเมนบอร์ด หรือในกรณีที่จำเป็นต้องพ่วงต่ออุปกรณ์ภายในหลายๆตัว ก็สมควรเลือกเคสขนาดใหญ่ขึ้นไปอีก เพื่อจะได้มีช่องบรรจุอุปกรณ์ต่างๆ ได้อย่างเพียงพอ
PC chassis Or are often referred to simply as "case (Case)", it looks like the camera-based, encapsulated within. They include: Power Supply Electronics, wiring, cables and other devices (such as hard disk drives and DVDs) in the present case, there are many variations of sizes to choose from. A case containing the power supply comes with the case in vain (must buy power supply, install additional self) key, use the computer case to match Form Factor motherboard or in case of need trailers. multiple devices You should choose the next big case. In order to have the packing equipment. Not enough
ข้อควรพิจารณาในการเลือกเคสคอมพิวเตอร์
Considerations for Choosing the computer case.
- เคสที่ดีจะต้องทำจากวัสดุคุณภาพดี แข็งแรง ซึ่งส่วนใหญ่มักทำจากเหล็ก หรือ อะลูมิเนียม รวมถึงพลาสติกสำหรับบางชิ้นส่วน
- เคสที่ดีจะต้องได้รับการออกแบบให้สามารถระบายความร้อนภายในเคสออกไปข้างนอกได้ดี
- เลือกขนาดเคสให้ตรงกับการใช้งาน สำหรับกรณีที่ต้องเชื่อมต่ออุปกรณ์ภายในจำนวนหลายชิ้น เช่น ติดตั้งฮาร์ดดิสก์หรือเครื่องขับดีวีดีหลายตัว เคสที่มีขนาดใหญ่ จะมีช่องให้บรรจุอุปกรณ์มากกว่า และระบายความร้อนได้ดีกว่า ดังนั้น แทนที่จะเลือกเคสแบบ Mini-Tower ก็ให้เลือกเป็นเคส Medium-Tower หรือ Full-Tower เป็นต้น
- ควรเลือกเคสจากผู้ผลิตที่น่าเชื่อถือ มีมาตรฐาน
2. A good case can be designed to vent the heat inside the chassis to the outside as well.
3. Select the size to match the usage cases. For cases that need to connect several pieces of equipment, such as installing a hard disk or DVD drive multiple. The larger case There will be more space for packing equipment. And dissipates heat better, so instead choose a Mini-Tower Case is available in Medium-Tower Case or Full-Tower and so on.
4. Should a case from a reliable manufacturer standards.
สำหรับรูปแบบเคสคอมพิวเตอร์ ในที่นี้ได้แบ่งออกเป็น 6 ประเภทหลักๆ ด้วยกัน คือ
For style computer case In this divided into six main categories, namely.
- เคสแบบฟูลทาวเวอร์ (Full Tower Case)
1. Full Tower Case (Full Tower Case).
Oakes is standing tall case this large. Not suitable for placing on the table. Suitable for laying on the ground. (Side table), a full-tower case. Within this type of case There will be enough space on the hard disk and a DVD containing the device was quite a character.
2. เคสแบบมีเดียมทาวเวอร์ (Medium Tower Case)
เป็นเคสวางตั้ง ทรงขนาดกลาง มีความนิยมอย่างแพร่หลาย เนื่องจากมีขนาดพอดี ไม่เล็กและไม่ใหญ่เกินไป สามารถวางตั้งบนโต๊ะได้ สำหรับการใช้งานโดยทั่วไปแล้ว เคสแบบมีเดียมทาวเวอร์ ถือว่ามีพื้นที่เพียงพอต่อการเพิ่มเติมอุปกรณ์ต่างๆได้เป็นอย่างดี
2. medium tower case (Medium Tower Case).
The case has put the medium is widely popular. Due fit Not small and not too big Can be put on the table For use in general. Medium tower case It has enough space for additional equipment as well.
3. เคสแบบมินิทาวเวอร์ (Mini Tower Case)
เป็นเคสวางตั้ง ทรงขนาดเล็ก ได้รับความนิยมเช่นกัน เคสชนิดนี้ถูกออกแบบให้มีช่องเพื่อเชื่อมต่ออุปกรณ์เพิ่มเติมต่างๆ เท่าที่จำเป็น
3. Mini Tower Chassis (Mini Tower Case).
Case put the small sizes have been popular as well. Cases of this type are designed to have a channel to connect additional devices. As long as needed
4. เคสแบบเดสก์ท็อป (Desktop Case)
จัดเป็นเคสรุ่นแรกๆ ที่นำมาใช้กับ IBM-PC ในอดีต รูปแบบเคสชนิดนี้จะเป็นทรงวางนอน สามารถวางบนโต๊ะแล้วนำจอภาพมาวางซ้อนบนเคสได้ สำหรับข้อเสียของเคสชนิดนี้ก็คือภายในเคสจะมีพื้นที่ค่อนข้างจำกัด จึงทำให้การอัปเกรดอุปกรณ์เพิ่มเติมต่างๆ ทำได้ค่อนข้างยาก
4. The Case for Integrated Desktop (Desktop Case).
It is the first case Used with IBM-PC in the form of a case of this kind will be put to sleep. The monitor can be placed on the table and put the overlay on the case. For disadvantage of this type of case is that the case will have a relatively limited area. To make the upgrade additional equipment. Quite difficult
5. เคสแบบสลิมไลน์ (Slimline)
เป็นเคสทรงขนาดเล็ก บาง และน้ำหนักเบา ถูกออกแบบมาเป็นพิเศษให้สามารถวางได้ทั้งแนวนอนและแนวตั้ง สำหรับข้อเสียในประเด็นหลักๆ ก็คือ ภายในเคสจะบรรจุอุปกรณ์พื้นฐานเท่าที่จำเป็น การอัปเกรดอุปกรณ์เพิ่มเติมมักทำไม่ได้
5. slimline case (Slimline).
His case is small, thin and lightweight. Designed specifically to be positioned both horizontally and vertically. For cons, the main issue is that the case will contain basic supplies as needed. To upgrade additional devices often do not.
6. เคสขนาดจิ๋ว (Mini Cube)
เป็นเคสขนาดเล็กพิเศษ รูปทรงคล้ายกล่อง ออกแบบมาสำหรับเมนบอร์ด Mini-ITX เท่านั้น เคสแบบ Mini-ITX นอกจากนำมาใช้งานได้เหมือนกับซีพีทั่วไปแล้ว ยังมักถูกนำไปใช้ เพื่องานบันเทิงอย่างมินิโฮมเฮียเตอร์ เนื่องจากรูปลักษณ์คล้ายกับเครื่องเสียงที่มีความลงตัวและเข้ากับสภาพแวดล้อมของชุดเครื่องเสียงต่างๆ ได้เป็นอย่างดี
6. Case Mini (Mini Cube).
Case small Shaped box Designed for Mini-ITX motherboard is a Mini-ITX case can be used as general CPI. Has often been used Thanks for entertaining mini home router. Because it looks like a perfect machine and the environment in the audio. As well
นอกจากเคสทั้ง 6 ประเภท ที่กล่าวมาในข้างต้นแล้ว ยังมีเคสแบบ All-In-One ที่ออกแบบด้วยการผนวกเคสรวมเข้ากับจอภาพ ซึ่งถูกผลิตขึ้นมาแบบสำเร็จจากโรงงานผู้ผลิตคอมพิวเตอร์แบรนด์เนมทั้งหลาย ดังนั้น เคสชนิดนี้จึงต้องซื้อยกชุด ที่สำคัญภายในไม่มีพื้นที่สำหรับเพิ่มเติมอุปกรณ์ใดๆได้
The case of the six categories mentioned above, there is a case for All-In-One is designed with an integrated chassis integrated into the monitor. Which was produced successfully from a computer manufacturer, brand name, so they had to buy a case of this kind set. The interior is no space for any additional equipment.

รูปที่ 3.4 เปรียบเทียบขนาดของเคสชนิดต่างๆ
Figure 3.4 Comparison of different types of cases.
Figure 3.4 Comparison of different types of cases.

เมื่อพิจารณาเลือกเคสคอมพิวเตอร์ตรงตามที่ต้องการได้แล้ว ก็สามารถเริ่มต้นประกอบเครื่องได้ โดยในที่นี้จะสาธิตให้ดูตามขั้นตอนต่างๆ ดังนี้
When selecting a computer case meets that need it. You can start assembling the machines. In this case, demonstrates the steps below.
1. Prepare the computer case Start by turning the screw or screw cap side. Then remove the side panel off.
2. Unlock the front panel case
3.Remove the front panel off the case
4.door sheep Bay (Drive Bays) 5.25 off one channel, which channel. A slot for inserting a DVD.
5 .image shows the Case In this case containing a power supply to be integrated.
6 .For some cases, a case that did not contain a power supply.
7 .Case No. Case Must be equipped with their own power supply.
When selecting a computer case meets that need it. You can start assembling the machines. In this case, demonstrates the steps below.
- จัดเตรียมเคสคอมพิวเตอร์ โดยเริ่มจากการหมุนคลายสกรูหรือเกลียวยึดฝาข้าง แล้วจึงถอดแผงฝาข้างออก
- ปลดล็อกแผงหน้าเคส
- ถอดแผงหน้าเคสออก
- แกะฝาช่องเบย์ (Drive Bays) ขนาด 5.25 นิ้ว ออกหนึ่งช่อง ซึ่งช่องดังกล่าว เป็นช่องสำหรับใส่เครื่องขับดีวีดี
- ภาพแสดงภายในเคส ซึ่งในที่นี้เป็นเคสที่บรรจุเพาเวอร์ซัพพลายมาให้แบบเบ็ดเสร็จ
- สำหรับเคสบางรุ่น เป็นเคสเปล่า ไม่ได้บรรจุ เพาเวอร์ซัพพลายมาให้
- กรณีเป็นเคสเปล่า จะต้องติดตั้งเพาเวอร์ซัพพลายเอง
1. Prepare the computer case Start by turning the screw or screw cap side. Then remove the side panel off.
2. Unlock the front panel case
3.Remove the front panel off the case
4.door sheep Bay (Drive Bays) 5.25 off one channel, which channel. A slot for inserting a DVD.
5 .image shows the Case In this case containing a power supply to be integrated.
6 .For some cases, a case that did not contain a power supply.
7 .Case No. Case Must be equipped with their own power supply.

การป้องกันความเสียหายของอุปกรณ์ระหว่างการประกอบเครื่อง
To prevent equipment damage during assembly.
ในระหว่างการประกอบเครื่องคอมพิวเตอร์และอุปกรณ์ต่างๆ อยู่นั้น มีความเป็นไปได้ที่ผู้ประกอบเครื่องมีความสะเพร่าเอง ทำให้อุปกรณ์บางชิ้นเกิดความเสียหายขึ้นมา สิ่งเหล่านี้มีโอกาสเกิดขึ้นเสมอ ไม่ว่าจะเกิดจากความไม่ระวัดระวัง ปรือความรู้เท่าไม่ถึงการณ์ก็ตาม โดยต่อไปนี้จะเป็นรายละเอียดเพิ่มเติมที่สรุปโดยคร่าวๆ เพื่อหวังให้ผู้ประกอบเครื่องได้รู้จักป้องกันและระมัดระวังมากขึ้น อันได้แก่
During the assembly of computers and devices is that there is a possibility that the assembly has its own sloppiness. Some items making up the damage. These things have always happened. Whether caused by the careful measurement. Prue ignorance or The following is a brief outline more details. I hope that the Assembly recognize and prevent more cautious, viz.
- เนื่องจากไฟฟ้าสถิตอาจส่งผลเสียหายต่ออุปกรณ์อิเล็กทรอนิกส์ได้ ดังนั้น ในระหว่างการประกอบเครื่อง การได้นำอุปกรณ์ป้องกัน เช่น ชุดสายรัดข้อมือป้องกันไฟฟ้าสถิต หรือถุงมือป้องกันไฟฟ้าสถิตมาใช้ ถือเป็นการป้องกันที่ดี
2. ในการประกอบเครื่องและการติดตั้งอุปกรณ์ต่างๆ จะเกี่ยวข้องกับอุปกรณ์ที่มีความแข็ง มีน้ำหนัก และมีความคม เช่น ครีบระบายความร้อน ไขควง และคีม เป็นต้น ดังนั้น ในระหว่างการติดตั้ง ต้องระมัดระวังเป็นพิเศษ โดยเฉพาะการครูด หรือการกระแทกอุปกรณ์ลงบนเมนบอร์ดอย่างแรง ซึ่งอาจไปกระทบเข้ากับลายวงจรบนเมนบอร์ดพอดี ทำให้ลายวงจรขาดเสียหาย รวมถึงอุปกรณ์อิเล็กทรอนิกส์ชิ้นเล็กๆ อาจเกิดความเสียหายตามมาได้เช่นกัน ในกรณีดังกล่าวอาจส่งผลให้เมนบอร์ดเสียหาย ใช้การไม่ได้ และที่สำคัญ บริษัทผู้ผลิตสามารถปฏิเสธการรับประกันอุปกรณ์สำหรับกรณีนี้ได้
2. To assemble and install the equipment. Be associated with a solid weight and a sharp cooling fins and pliers, screwdrivers, etc. So during installation. Care must be taken Particularly galling Or shock devices on the motherboard. This may go on to a short circuit on the motherboard fit. Making the circuit of damage Including electronics, small pieces. Damage may ensue as well. In such cases it may result in damage to the motherboard is not working and that the manufacturer can reject the warranty for this case.
3. ในการยึดแผงเมนบอร์ดเข้ากับตัวถังเครื่อง ซึ่งจะใช้วิธีการขันสกรูลงไปในตำแหน่งรูยึด ให้ขันพอรู้สึกตึงมือก็เพียงพอ การขันแน่นจนเกินเหตุ อาจทำให้ตำแหน่งรูยึดบนแผงเมนบอร์ดร้าวหรือแตกได้
3. To secure the motherboard to the chassis panel. Which is used to tighten the screws into the holes. Funnily enough, it's enough to feel a hand. The tightening beyond reason May make the mounting holes on the motherboard panel cracked or broken.
4. สายสัญญาณ สายไฟ และขั้วต่อปลั๊กไฟต่างๆ ภายในเคส จะต้องถูกรวบและรัดให้เป็นระเบียบ เพื่อป้องกันการเข้าไปขัดกับใบพัดของพัดลม และบดบังทิศทางการระบายอากาศ
4. Cable wiring and connector plug in the chassis must be bundled and strapped into a mess. Contrary to protect the blades of the fan. And blocking the ventilation
5. ระวังอย่าให้มีเศษวัสดุที่มีคุณสมบัติป็นตัวนำไฟฟ้า หล่นอยู่บนเมนบอร์ดในขณะประกอบเครื่อง เช่น เศษโลหะ น็อต/สกรู หรือขดลวดต่างๆ โดยเฉพาะหากเศษโลหะเหล่านี้ ตกหล่นอยู่ในตำแหน่งที่ล่อแหลม อาจก่อให้เกิดไฟฟ้าลัดวงจรในขณะเปิดเครื่อง ดังนั้น เมื่อประกอบเครื่องเสร็จ ควรตรวจสอบให้ละเอียดแน่ชัดอีกครั้ง ก่อนปิดฝาเครื่อง
5. Be careful not to waste qualified as conductors. Fell on the motherboard while assembling as scrap metal bolts / screws or wire services. Especially if these scrap metal. Fall in a precarious position Could cause a short circuit in the open air, so when the assembly is completed. Should investigate thoroughly clear again. Before closing the lid